Tutorial: Importing a picture for My Coloring Book
You can create your own coloring pages using the My Coloring Book Editor (MCBEdit) by importing existing graphics, copying and pasting, drawing and scanning, or using the built-in drawing tools.
Here are the basic steps to create a picture using the import feature...
1. Get the initial picture.
Ideally you want to start with a picture that is as big or BIGGER than the final coloring page size. My Coloring Book can automatically scale your picture to fit, so by creating a larger image you get a much smoother picture when it is scaled.
There's a trade off with file size, but a 2,000px x 1,500px black and white GIF will only be around 50K.
You can start with a picture that you've downloaded from a website, or found on a clip-art CD, etc.
You can also draw a picture and then scan it in.
To make it easy to find it later, save the file somewhere like My Pictures.
2. Import the picture.
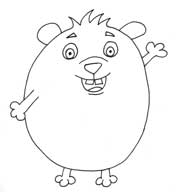 |
Run MCBEdit.exe and select File | Import graphic file (Ctrl+I) from the menu. Select the file to import (e.g. guineapig2.jpg). Click the [Open] button. |
3. Convert the picture
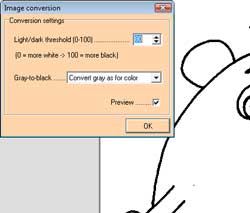 |
All Kea Coloring pages must be just black and white (no colors or gray). If needed, the Image Conversion tool opens automatically when you are importing a picture. Adjust the light/dark threshold and the gray-to-black setting to get the best result you can (In our example we used a threshold of 80). When you have a good result, click [OK]. |
4. Resizing the picture
You can resize the picture, by choosing Edit | Resize from the menu. For best results we recommend scaling your image to the size you want in a graphics tool BEFORE importing. (GIMP is a great free graphics editor that will do an excellent job).
5. Editing the picture
You can edit the picture by selecting Edit | Edit picture (F2). Use the pencil tool to fix up gaps in the outline, or to add small details. The eraser can be used to erase unwanted spots or smudges.
6. Testing the picture
 |
You should always test your picture to be sure it colors in the way you want it to. Choose a dark color (e.g. purple) to fill in all the white areas. Make sure that paint doesn't leak out where it shouldn't, and that there are no little white spots that are hard to paint. You may want to zoom in close to tidy up little gaps and other fine details. |
7. Saving the picture
Choose File | Save from the menu. Enter a name for the file (e.g. guineapig), and click the [Save] button.
The .gif extension will be added automatically.